

Easy Crochet Pattern for Beginners: A Step-by-Step Guide
Crochet is one of those timeless crafts that never goes out of style. From cozy blankets and handmade scarves to cute little coasters and toys, crocheting allows you to create beautiful, useful, and even sentimental pieces with just a hook and some yarn. If you’re new to crochet, getting started can feel overwhelming. There are so many different stitches, patterns, and types of yarn that it might seem complicated. But don’t worry—everyone starts from the beginning, and with the right guidance, you’ll be creating your first crochet project in no time.
In this beginner-friendly blog post, I’ll walk you through an easy crochet pattern step by step. This project is perfect for anyone picking up a crochet hook for the first time. By the end, you’ll have a small swatch that can be used as a coaster, a dishcloth, or simply as practice. More importantly, you’ll build the confidence to move on to bigger and more exciting projects.
Why Crochet Is Perfect for Beginners![]()
Crochet is a craft that is both affordable and accessible. All you really need to get started is yarn, a hook, and a little patience. Unlike knitting, crochet uses only one hook, making it easier to control and less intimidating. Plus, mistakes are simple to fix—you can usually just pull out the stitches and try again without much trouble.
Another great thing about crochet is how relaxing it can be. Many people find it therapeutic, almost like meditation. As your hands move rhythmically through the stitches, your mind can focus, calm down, and enjoy the process.
What You’ll Need
Before we start with the pattern, let’s go over the basic materials:
-
Yarn: A medium-weight cotton yarn (size 4) is great for beginners because it’s easy to see your stitches and not too slippery.
-
Hook: A 5.0 mm (US size H-8) crochet hook works perfectly with medium-weight yarn.
-
Scissors: To cut your yarn at the end of your project.
-
Yarn needle: A blunt needle to weave in loose ends.
Optional but helpful: stitch markers, especially if you’re prone to losing track of where a row starts or ends.
Step 1: Make a Slip Knot
Every crochet project starts with a slip knot. This simple loop will secure the yarn to your hook. Make a loop, pull a strand of yarn through it, and tighten gently around your hook.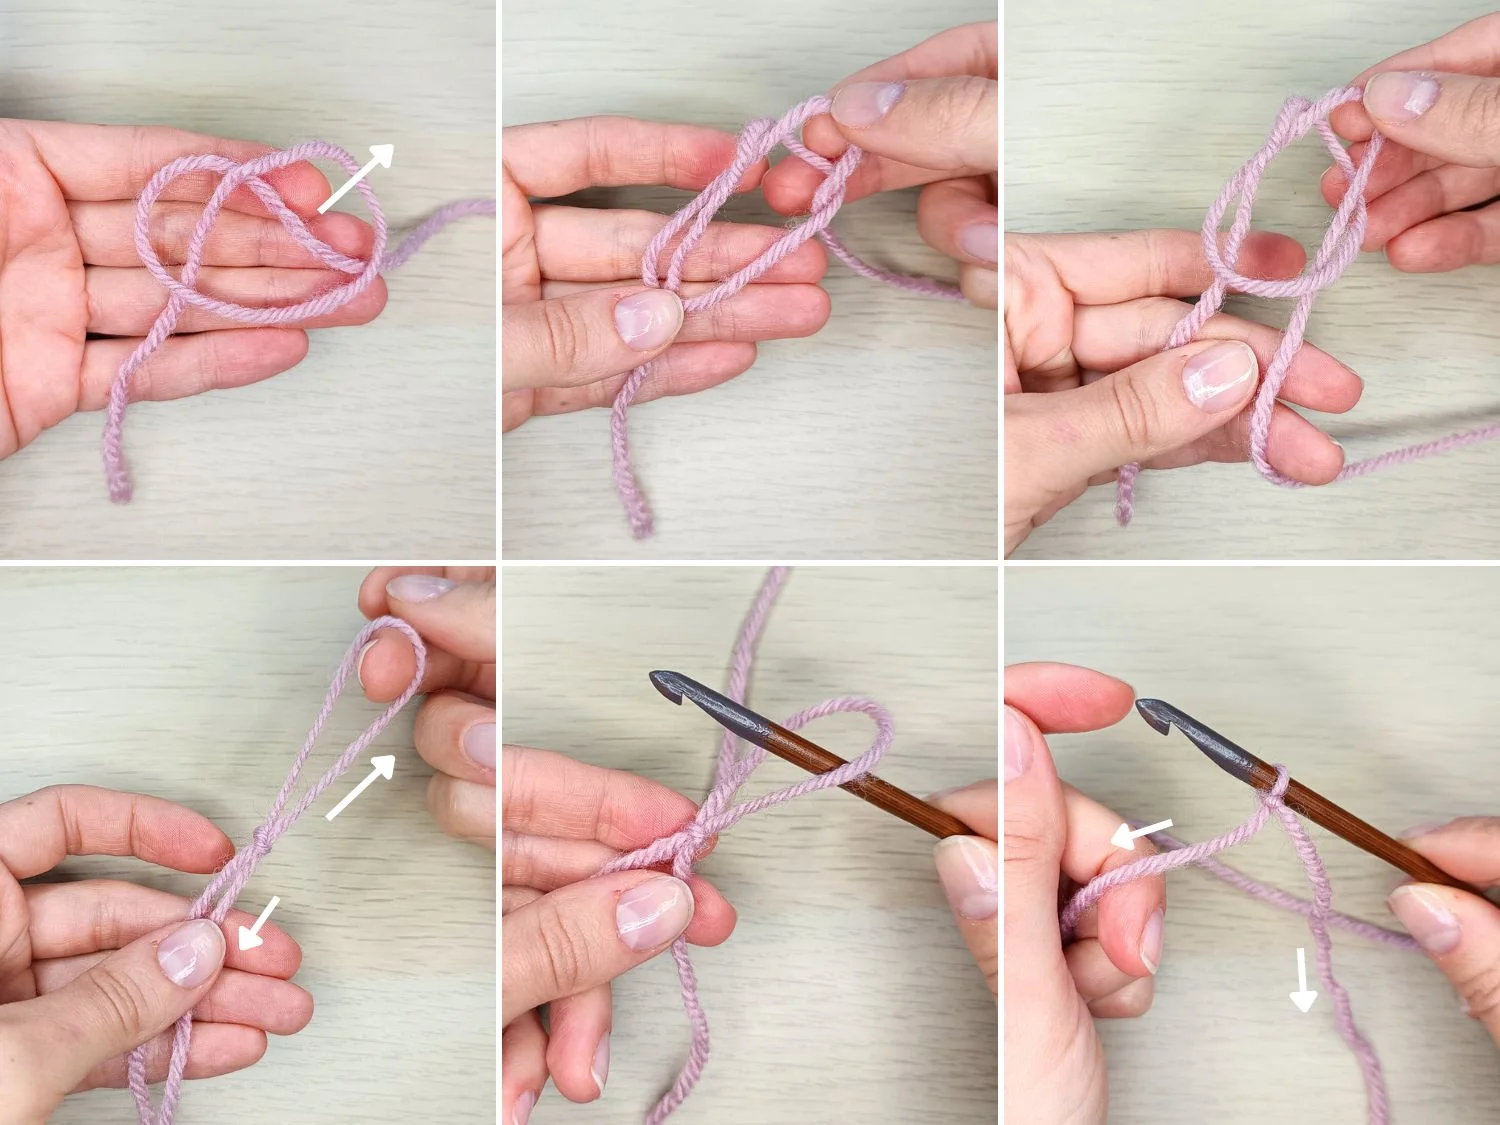
Step 2: Crochet the Foundation Chain
For this pattern, chain 20 stitches. To make a chain, yarn over your hook and pull it through the loop. Each time you do this, you’ll create a new chain. Try to keep your tension even—this will make your stitches neat and easier to work into.
Step 3: Single Crochet Across
Starting in the second chain from your hook, work a single crochet (sc). To do this, insert your hook into the stitch, yarn over, pull through, yarn over again, and pull through both loops on your hook. Continue this stitch all the way across the row.
Step 4: Repeat the Rows
When you finish the first row, chain 1, turn your work, and single crochet across again. Continue this process for about 15 rows. You’ll see your project forming into a nice rectangular swatch.
Step 5: Finish Off
Once you’ve reached your desired size, cut the yarn, leaving a 6-inch tail. Yarn over and pull the tail through the last loop on your hook to secure your stitches. Use your yarn needle to weave in the ends so they don’t unravel.
Congratulations! You’ve just completed your first crochet project.
Tips for Beginners
-
Choose the right yarn color: Avoid dark yarns at the beginning—they make it hard to see your stitches.
-
Practice your tension: Consistent tension is key to even stitches. Don’t worry if it takes a while to get right.
-
Start small: Begin with simple projects like coasters, dishcloths, or scarves before moving on to complex patterns.
-
Watch your posture: Crocheting for long periods can cause hand strain. Take breaks and stretch your fingers.
-
Use online tutorials: YouTube and crochet blogs are amazing resources if you ever get stuck.
Common Mistakes Beginners Make (and How to Fix Them)
-
Uneven edges: This usually happens when you accidentally add or skip stitches. Count your stitches at the end of each row to keep your project even.
-
Too tight stitches: If your hook feels stuck, loosen your grip on the yarn. Tight stitches make crocheting frustrating.
-
Splitting yarn: Sometimes the hook catches only part of the yarn strand. Slow down and make sure you’re pulling through all strands.
-
Skipping the turning chain: Remember to chain 1 at the end of each row before turning. This keeps your edges straight.
What Can You Do With Your First Crochet Swatch?
You may be wondering what to do with the small rectangle you just made. Here are some ideas:
-
Use it as a coaster for mugs and glasses.
-
Turn it into a mini dishcloth.
-
Make several and stitch them together into a larger piece, like a scarf or blanket.
-
Keep it as your first “practice piece” to remind yourself how far you’ve come!
Your Next Crochet Projects
Once you’ve mastered the single crochet, you can expand your skills by learning new stitches like half-double crochet (hdc), double crochet (dc), and the granny square technique. Beginner-friendly projects include:
-
Dishcloths: Practical and simple, perfect for practicing stitches.
-
Scarves: A fun way to experiment with different yarn colors.
-
Granny Squares: These can be joined together to make blankets, bags, or even clothing.
Each project you complete will build your confidence and improve your technique.
Final Thoughts
Crochet is a rewarding hobby that allows you to relax, create, and even give meaningful handmade gifts. This easy crochet pattern for beginners is just the first step in your journey. Don’t be discouraged if your stitches don’t look perfect—practice really does make progress. Every crocheter started as a beginner, and with time, your skills will grow.
So grab your yarn and hook, follow this guide, and start your very first crochet project today. Who knows? You might just fall in love with the art of crochet and discover a lifelong passion.
👉 Want more easy crochet patterns and step-by-step tutorials? Subscribe to our blog and join the community of makers who are learning, creating, and sharing together.
